Prompts in Ofuma: Every Knob, and What It Actually Does
A prompt looks like a harmless little string until you try to change it in production. Every field, every parameter, and how to call it from four lines.
By Dumebi ·
Think about a recipe card in a family kitchen. The card says "add salt to taste." Everybody who has cooked from that card knows roughly what it means, and everybody produces something slightly different. Now imagine the card is the only thing standing between your company and a customer, it gets read ten thousand times a day, and one day somebody quietly rewrites "to taste" into "two cups." Nobody remembers what it said before. There is no second card.
That is a prompt living inside application code. It is the recipe your product cooks from, it is written in plain English so it looks casual, and in most codebases it has none of the protection that even a boring config file gets.
The Prompts section of Ofuma exists to give that recipe card a real home: a name, a history, a config, a set of safety rules, and an address your code can call without ever knowing what the card currently says. This article is the full tour. Not a highlight reel: every field, what it defaults to, and what it actually does when you change it.
Grab a cup of tea. This one is long on purpose. ☕
The mental model: prompt, version, message
Before any button-clicking, get these three words straight, because the whole UI hangs off them.
A prompt is the name. It is basically an empty folder with a label on it: Movie Review, Task Generator. It holds almost nothing itself.
A version is the actual content plus configuration, frozen. Every time you save a change, you do not overwrite anything. You get a new version row. The old one sits there forever, exactly as it was. This is the part that makes prompts behave like code instead of like a Google Doc that six people are quietly editing.
A message is one block inside a version: a system block, a user block, an assistant block. A version holds an ordered list of them.
So the shape is: prompt (name) → many versions (content + config) → many messages (the actual text).
One consequence worth internalising early: creating a prompt does not create a version. Creating a prompt inserts exactly one row and stops. Your new prompt has zero versions until you open the editor, make an edit, and save. A freshly created prompt is genuinely an empty labelled folder, and it stays that way until you put something in it.
Step 1: Creating a prompt
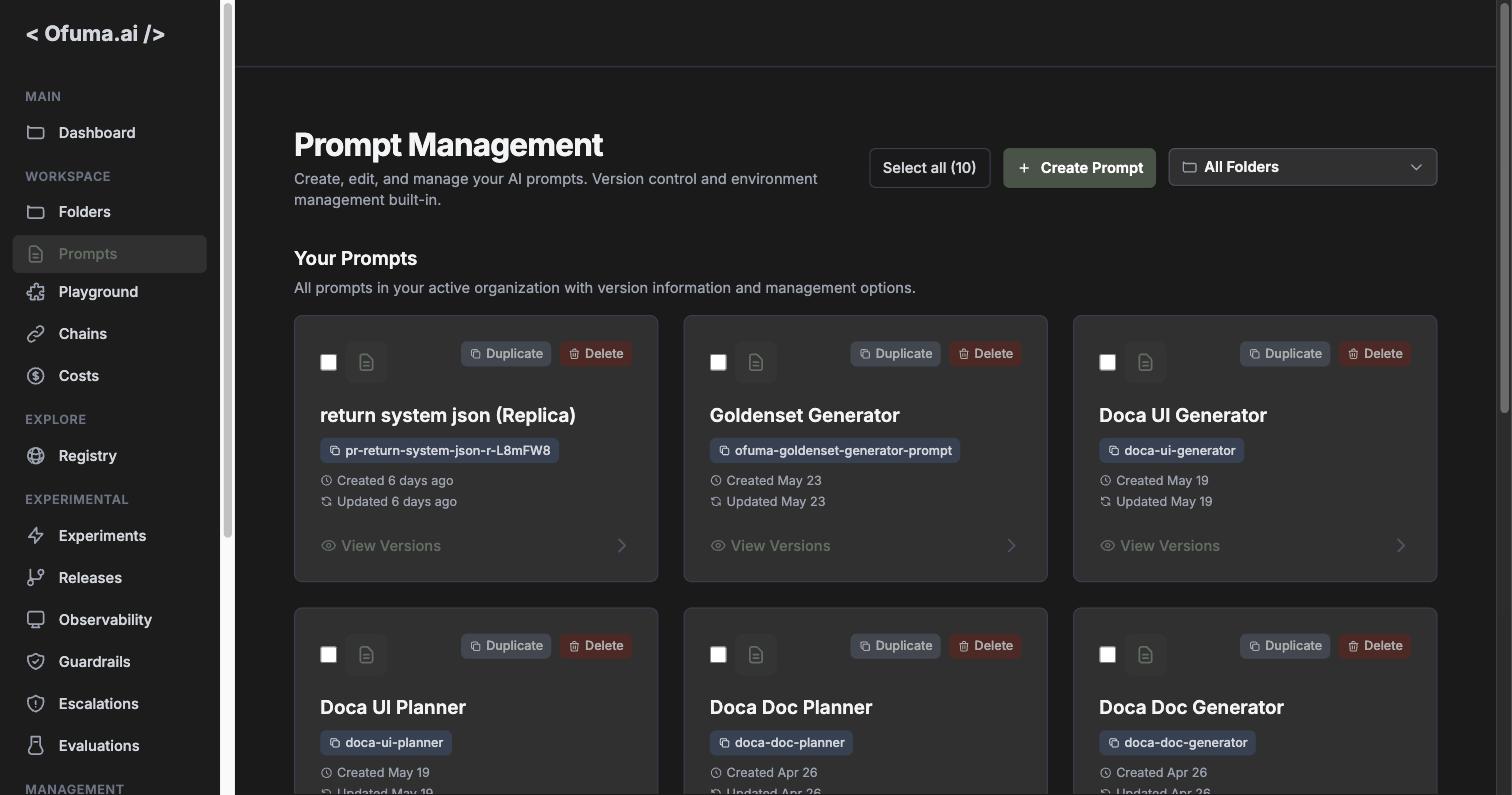
Go to Prompts in the sidebar. This is the list view, and every card shows the prompt's name, its short public ID, and when it was last touched.
Hit Create Prompt. The modal is refreshingly small. Three fields, and only one is required.
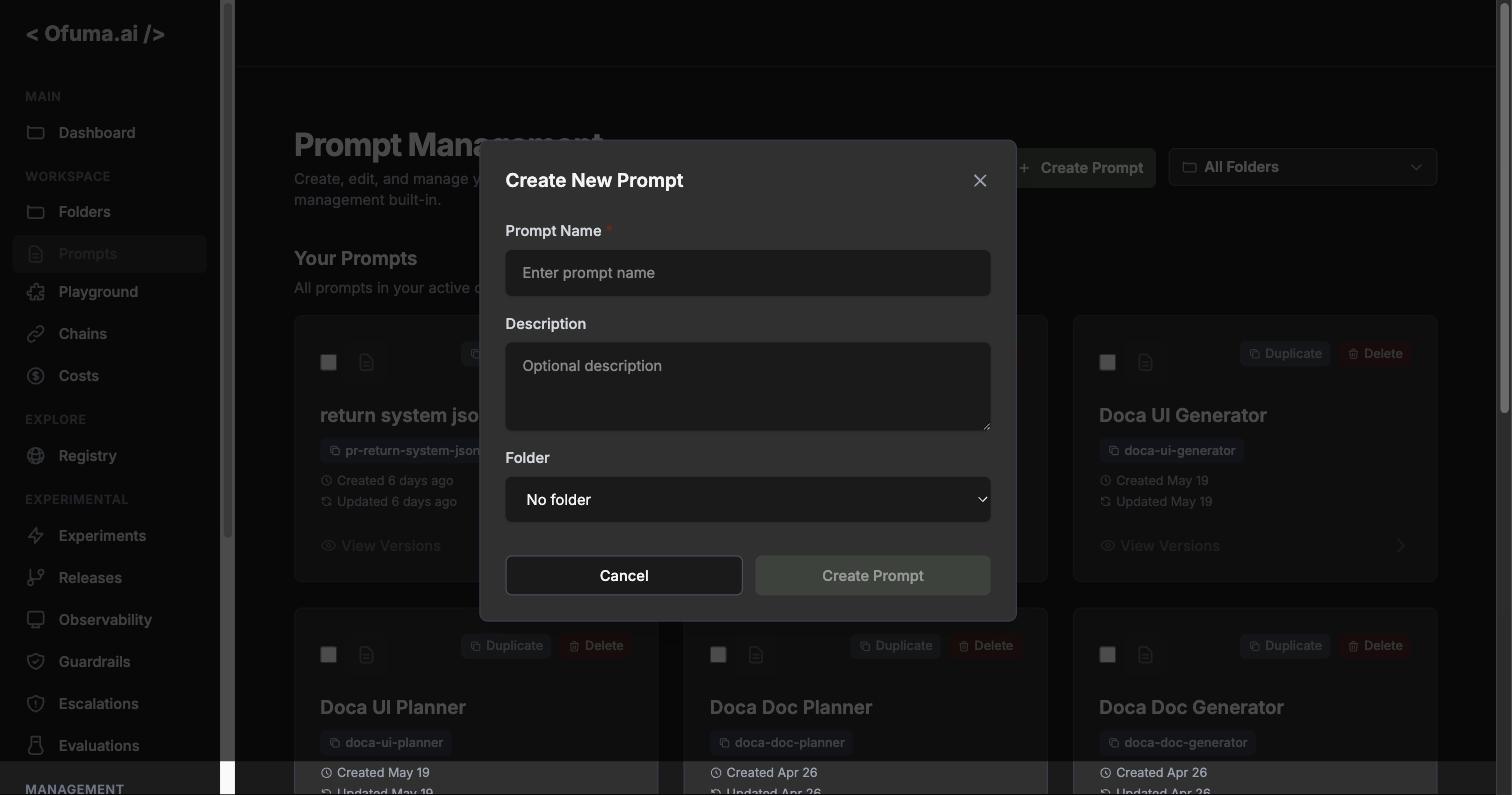
Name (required)
Description (optional, max 500 characters)
Folder (optional, and the dropdown has a "Create New Folder..." option so you can make one without leaving)
That is it. No model picker, no tags, no temperature. Those all come later, in the editor, because they belong to a version, not to the prompt.
The name has a few rules that are worth knowing up front:
Minimum 3 characters, maximum 200
No pipe character (
|)Cannot start with
/, cannot end with/, and no//anywhere insideCannot be
new,create, oreditMust be unique within your team
Those three reserved names look arbitrary until you notice they are route names. If a prompt could be called new, then the URL /prompts/new becomes ambiguous: is that the editor for a prompt named "new", or the create page? Rather than let that ambiguity exist, they are simply reserved. It is a small thing, but it is the kind of small thing that saves a genuinely annoying afternoon.
Behind the scenes each prompt also gets a short public ID, generated as pr- plus a slug of the name (up to 20 characters) plus 6 random characters. That is where pr-return-system-json-r-L8mFW8 comes from. This short ID is what your code will call, and it stays stable even if you rename things later.
Step 2: The editor, in three panes
Open a prompt and the screen splits into three, which map neatly onto the three concepts above.
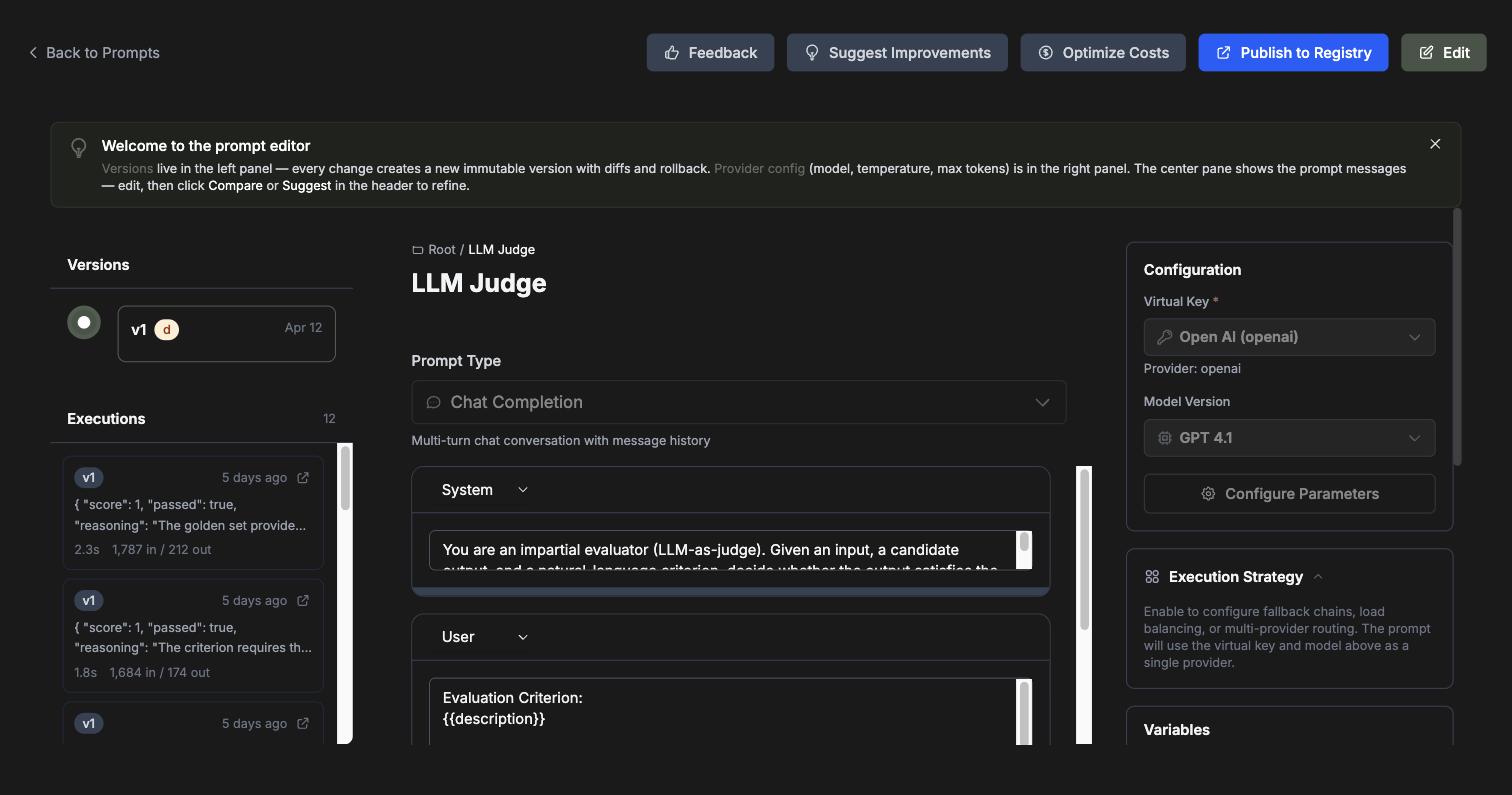
Left is history: the version timeline and, under it, the executions list with latency and token counts, like 2.3s 1,787 in / 212 out.
Centre is content: the prompt type and the message blocks.
Right is configuration: which key, which model, the model parameters, execution strategy, variables, and guardrails.
The editor opens read-only, which is deliberate: this thing is running in production and a stray click should not change it. Hit Edit in the top right and the controls come alive, the header swapping to Review and Cancel. Cancel genuinely discards. You can toggle things freely, back out, and the version is untouched.
Step 3: Prompt type and messages
Prompt Type picks how your text is shaped:
Chat Completion: the structured, multi-block form with roles. This is what you want almost always.
Text Completion: one raw textarea, no roles.
In chat mode you add blocks with Add Message Section, and each block has a role dropdown: system, user, or assistant. Those three are the whole vocabulary. Order comes from the order of the cards on screen, so the convention you want is the obvious one: a system block at the top setting the rules, then a user block carrying the request.
Step 4: Variables
Variables are the holes you leave in the recipe for the caller to fill.
You do not declare them anywhere. You just write {{variable_name}} in the text and Ofuma finds it. The right panel literally says "Auto-detected from {{curly braces}} in content." For example LLM Judge prompt uses two:
Evaluation Criterion:
{{description}}

PROMPT INPUT:
"""
{{input}}
"""
Nested paths work too, so {{user.name}} and {{items[0].value}} are both valid.
Once detected, each variable gets exactly two settings in the Variables card:
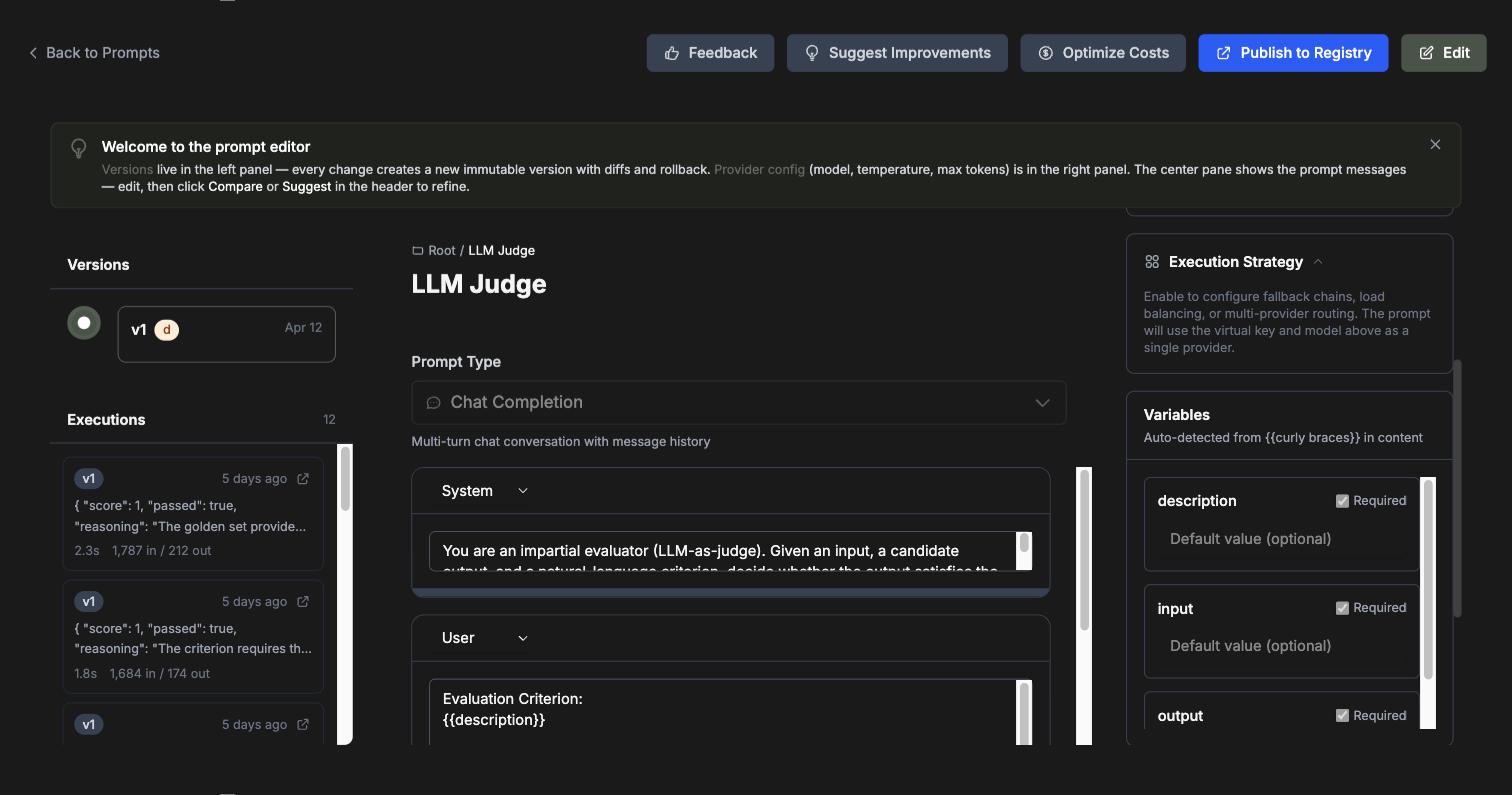
Required (checkbox, defaults to on)
Default value (text, optional)
There is no type selector, because every variable is a string. Keep that in mind when you are passing numbers around.
At execution time, a missing required variable throws a 422 missing_variables, which is a clean, loud failure. Extra variables you pass that the prompt does not use are ignored, so callers can send a fat context object and let each prompt take only what it needs.
Step 5: Which model, and with whose key
The Configuration card at the top right has three parts.
Virtual Key (required) is the credential. Instead of pasting a raw API key into a prompt, you pick a key that lives somewhere safer, and the prompt just points at it. Choosing the key is what fixes the provider: pick Open AI (openai) and the panel shows Provider: openai underneath, so there is no separate provider dropdown to get out of sync with the key.
Model Version is the specific model, like GPT 4.1.
The model catalogue you pick from covers three providers: 16 Anthropic models (the Claude 4.x family down to Claude 2.1), 16 OpenAI models (the GPT-4.1 family, the o-series, GPT-4o, GPT-3.5-turbo), and 4 Google models. That is 36 models in the dropdown, which is enough choice to be interesting and few enough to actually read.
Step 6: Model parameters, the whole list
Click Configure Parameters (while in Edit mode) and a drawer slides in. This is the heart of the thing.
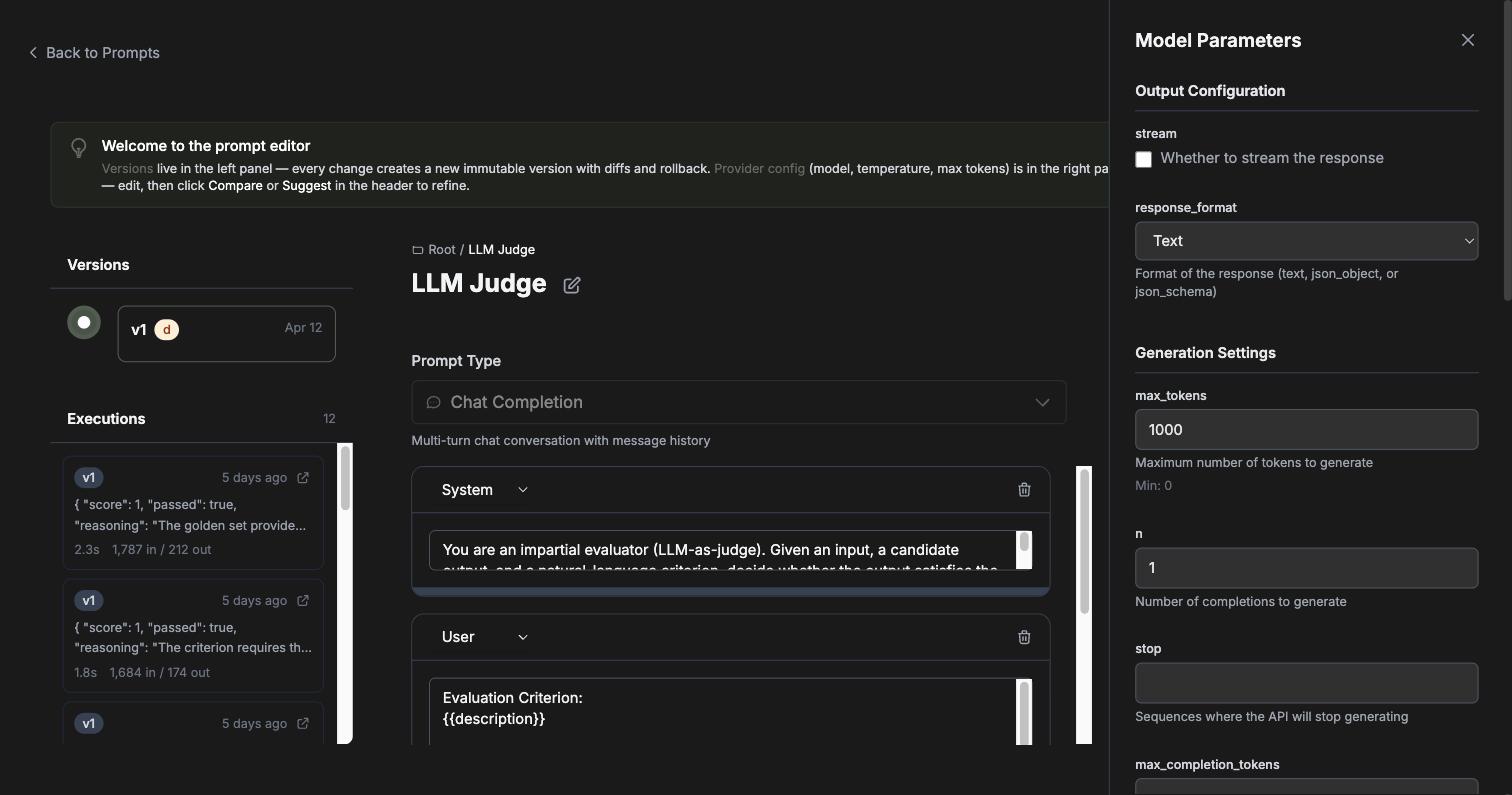
The drawer groups parameters so you are not staring at twenty inputs at once: Output Configuration, Generation Settings, Sampling Parameters, then a collapsed Advanced section, then Tools.
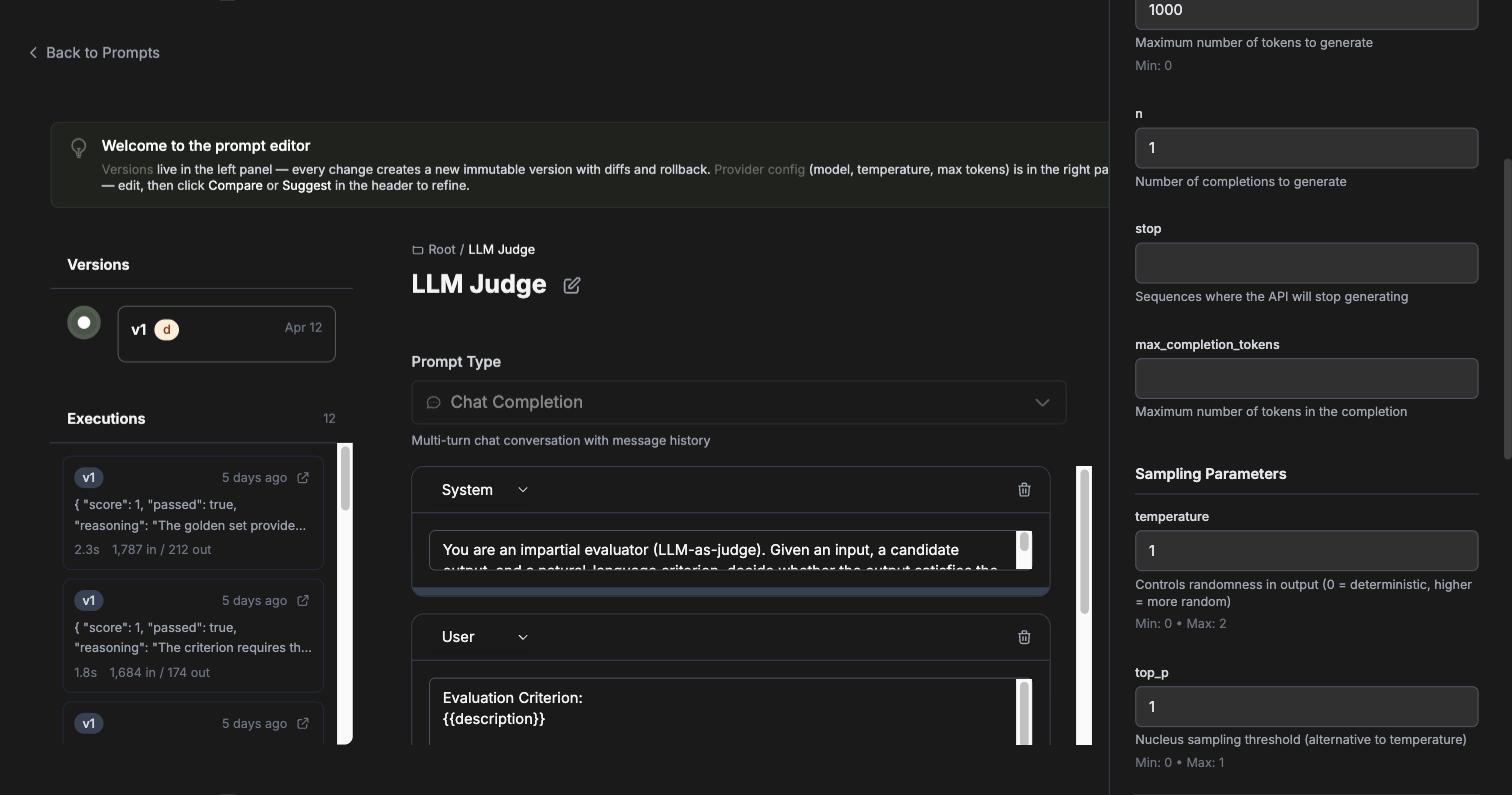
Here is the complete table for OpenAI, with the real defaults and the real bounds:
Group | Parameter | Default | Range | What it does |
|---|---|---|---|---|
Output |
|
| on/off | Stream the response back token by token |
Output |
|
| text, json_object, json_schema | Force the shape of the reply |
Generation |
|
| min 0 | Ceiling on tokens generated |
Generation |
|
| - | How many completions to generate |
Generation |
| none | - | Sequences that halt generation |
Generation |
| none | - | Ceiling on the completion specifically |
Sampling |
|
| 0 to 2 | Randomness. 0 is deterministic |
Sampling |
|
| 0 to 1 | Nucleus sampling, an alternative to temperature |
Sampling |
| none | -2 to 2 | Penalise tokens that already appeared |
Sampling |
| none | -2 to 2 | Penalise tokens by how often they appeared |
Advanced |
| none | - | Nudge specific tokens up or down |
Advanced |
| none | - | An end-user identifier |
Advanced |
| none | - | Fixed seed for deterministic output |
Advanced |
|
| on/off | Include log probabilities in the output |
Advanced |
| none | - | How many likely tokens to return per position |
The Advanced group is collapsed by default, which is fair, but do not ignore it. seed plus temperature: 0 is how you get runs you can actually compare against each other. And logprobs being on by default matters more than it looks: it is the raw material for confidence scoring, which is what feeds the whole escalation system further down. I have written before about what logprobs actually tell you, and this checkbox is where that theory meets a real switch.
Anthropic is not the same shape
This is the part that quietly catches people who assume one config fits all providers. Anthropic's parameters have genuinely different bounds:
Parameter | OpenAI | Anthropic |
|---|---|---|
| default 1000, no hard ceiling | default 1024, hard ceiling 8192, and required |
| 0 to 2 | 0 to 1 |
| 0 to 1 | -1 to 1 |
| not available | -1 to 500 |
So a temperature of 1.4 is perfectly legal on GPT-4.1 and simply not a thing on Claude. If you switch a prompt's provider and keep the numbers, that is the wall you will meet. Anthropic also exposes a thinking toggle for extended thinking, and maps stop onto stop_sequences for you, so you write the parameter once and the right shape reaches the provider.
Step 7: Tools and tool choice
Below the parameters is a Tools box. It takes OpenAI-style function definitions as raw JSON, and there is an "Insert example" button that drops in the skeleton:
[
  {
    "type": "function",
    "function": {
      "name": "your_tool",
      "description": "...",
      "parameters": { ... }
    }
  }
]
The panel notes that the same shape works for Anthropic, and that extras like cache_control pass through untouched. That is a nice touch: you are not fighting a lowest-common-denominator abstraction that strips out the provider-specific things you actually wanted.
Tool choice is a dropdown with four settings: auto (the model decides), none, required (it must call something), and specific (you pin it to one named function).
The panel also shows capability badges for the selected model, so you can see at a glance whether it supports Streaming, Function Calling, and Vision before you design around them.
Step 8: Execution Strategy, which is where "fallback model" lives
There is no field called "fallback model." What you want is the Execution Strategy panel, and it is off by default. When it is off, the prompt simply uses the single virtual key and model above, which is the right default for most prompts.
Toggle it on and you get a Strategy Mode dropdown plus a list of Targets. Three modes:
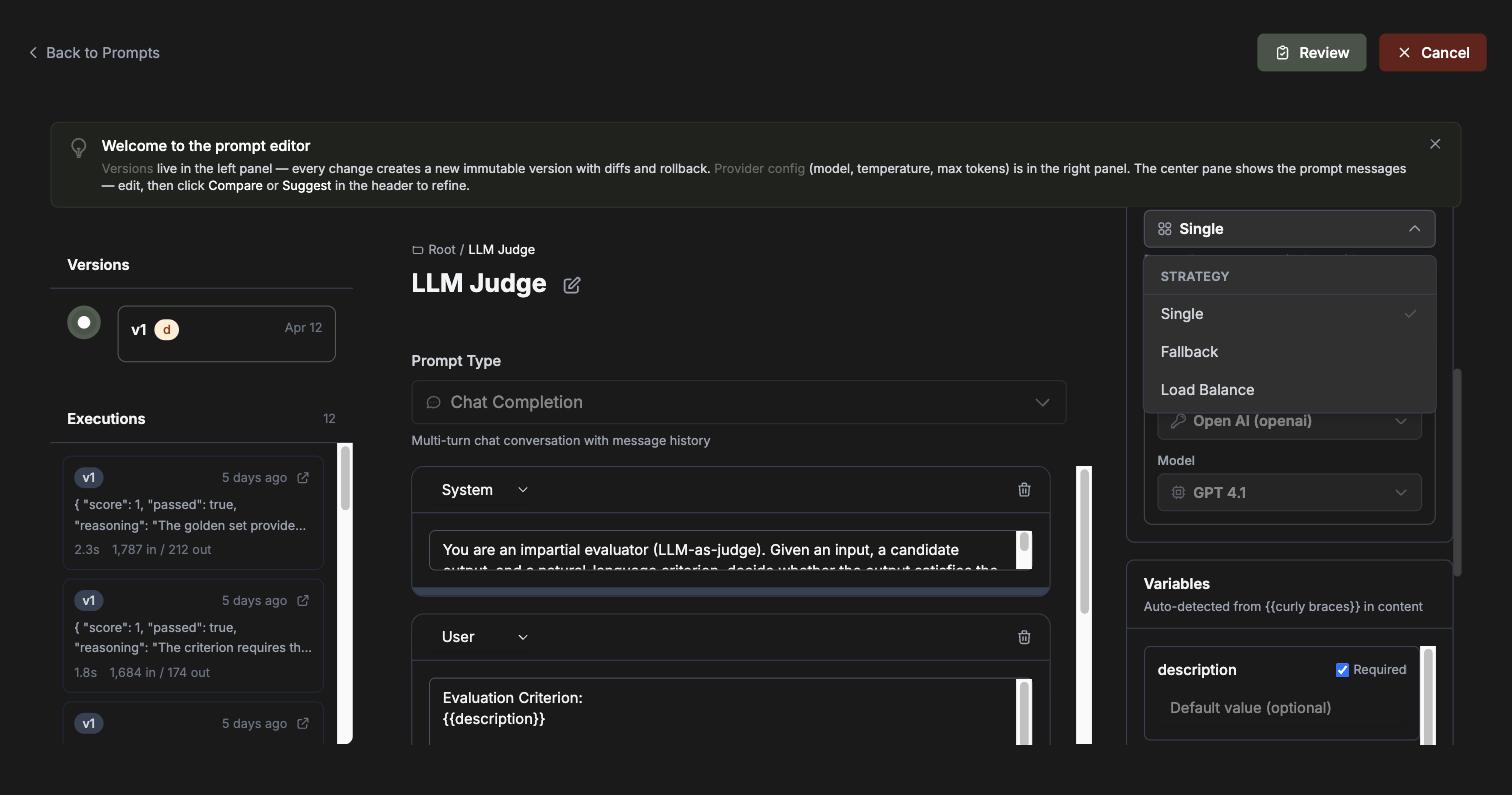
Single routes everything to one target. Same as leaving the toggle off, just stated explicitly.
Fallback is the one you probably came for. You list targets in order, and the executor walks down the list. Target two is only tried if target one fails.
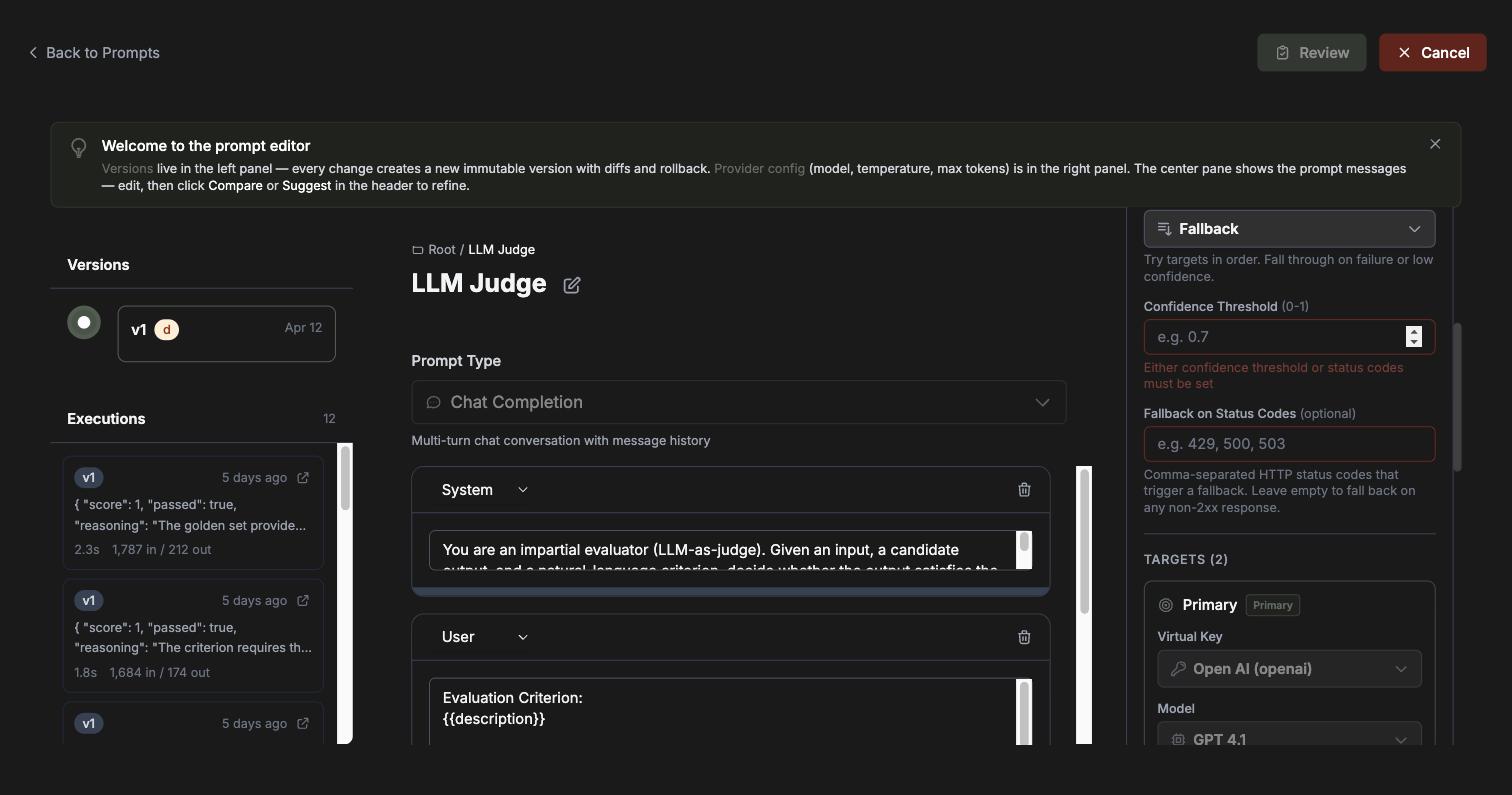
Notice that picking Fallback immediately bumps TARGETS from 1 to 2. A fallback with one target would be a contradiction, so it gives you the second slot straight away. The Primary card keeps your original key and model, and the new one is where you put the understudy.
You control what "fails" means with Fallback on Status Codes: give it a comma-separated list like 429, 500, 503, and the executor moves on when it sees one. Leave it empty and the rule becomes the sensible default that the field itself describes: fall back on any non-2xx response. That default is the one I would reach for first, because it needs no thinking and catches everything that is plainly broken. Reach for the explicit list when you want to fall back on rate limits (429) but not on your own bad request (400), since retrying a malformed call on a second provider just buys you the same error twice.
This is how you say "use Claude, but if Anthropic is having a day, quietly use GPT-4.1 instead," and your calling code never learns that anything happened.
Load Balance spreads traffic across targets by weight. A missing weight counts as 1, and the weighted draw is re-rolled on every single request, so it is per-request random rather than sticky per user. Useful for splitting spend across two providers, or easing a new model in at 10 percent.
Step 9: Attaching a guardrail
Guardrails are the rules that inspect what goes into the model and what comes out. They get their own article, but here is the prompt-level view.
The Guardrails panel sits at the bottom of the right rail, under Variables and Labels, and appears once you are editing an existing prompt. Hit + Add and you get a search box over every guardrail available to you.
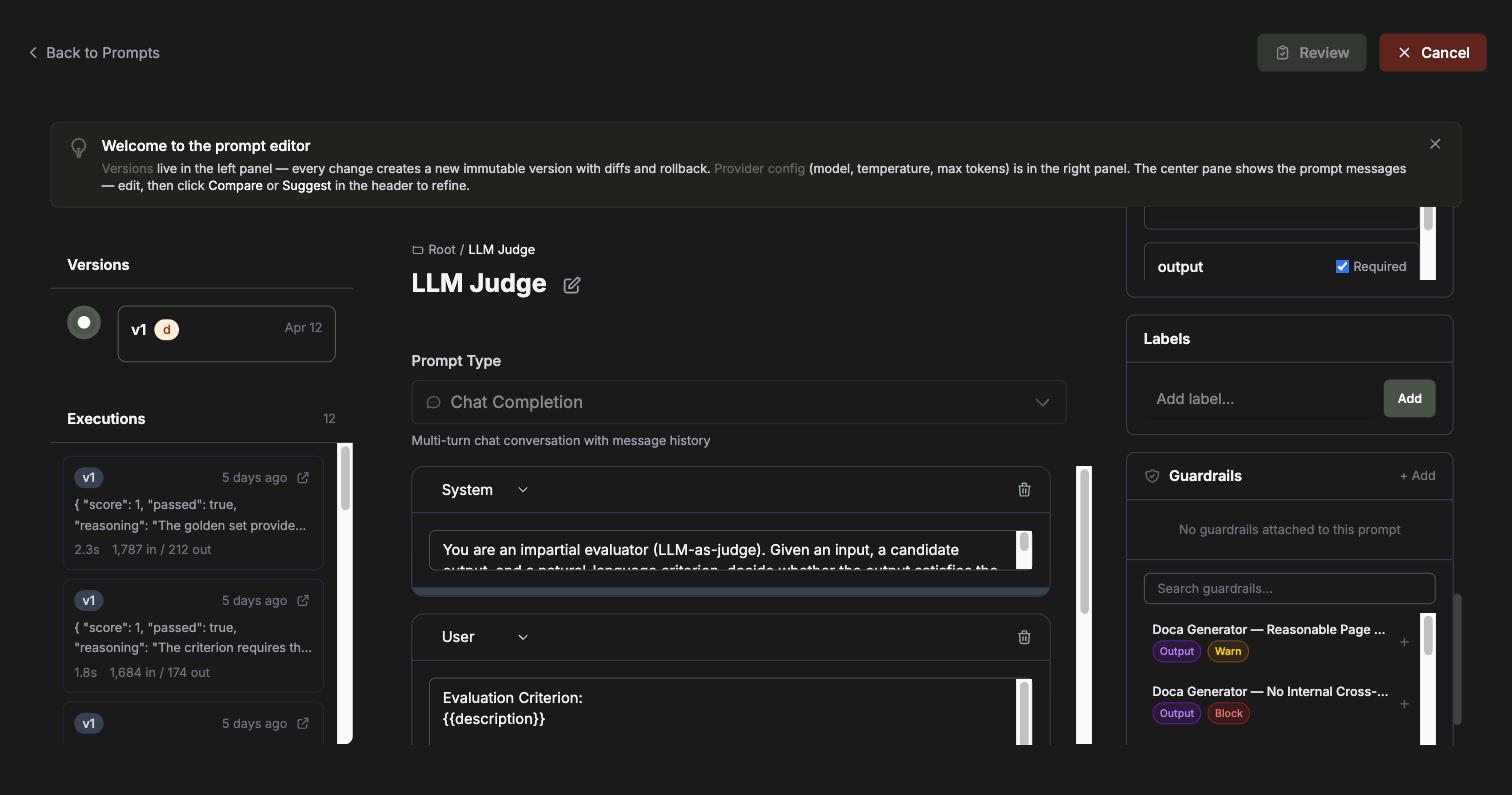
The useful part is that each row is already labelled with the two things that matter, so you can pick correctly without opening anything: a stage tag (Output) and a severity tag (Warn or Block). Click the + on a row and it is attached. You can override the severity for this one prompt if you want a rule that blocks elsewhere to merely warn here.
Those two properties decide everything about how a guardrail behaves.
Stage is input, output, or both. Worth knowing: both runs the check twice, once before the request and once after, and records a result for each.
Severity is where the teeth are:
blockdenies. A failing input check means the provider is never called at all, so you do not pay for a request you were going to throw away. A failing output check turns a successful model answer into an error rather than letting it reach the user. Either way your caller gets an HTTP 446 with ahooks_failedbody. (446 is Ofuma's own signal, not a standard code, so do not go hunting for it in an RFC.)warnruns, records the result, and never denies. This is how you watch a rule in production before you trust it enough to enforce it.logis fire-and-forget and never denies.
Streaming has its own wrinkle: a non-denying failure still returns your stream, but stamped with a synthetic HTTP 246 so you can tell that something tripped without breaking the stream.
The built-in plugins cover the boring-but-essential ground: default.regexMatch, default.wordCount, default.jsonKeys, default.jsonSchema, default.contains, default.validUrls, default.modelWhitelist, and more, plus default.escalate, which is the interesting one.
Step 10: Confidence and escalation
Attach the default.escalate guardrail to a prompt and you get human-in-the-loop review. It is output-stage only, and its default parameters are { threshold: 0.7, priority: 'medium' }. When the model's confidence in an answer falls below the threshold, that execution is queued as an escalation for a human to look at.
Two things shape how you use it.
It reads confidence from log probabilities, so the request needs logprobs: true. That is the default for OpenAI, so this works out of the box, but it is the connection to remember: log probabilities in, confidence out.
It does not block. Unlike a block guardrail, escalation leaves the HTTP response completely alone. The user still gets their answer at full speed. A row is queued for review in the background. It is a tap on a reviewer's shoulder, not an emergency brake, which is exactly what you want for "this one was a bit shaky" rather than "this one was dangerous."
The confidence number itself is a blend of two signals:
combinedConfidence = (logprobsConfidence * 0.7) + (guardrailPassRate * 0.3)So the model's own certainty carries most of the weight, and how cleanly the answer passed your other guardrails carries the rest. If only one signal is available, it uses that one alone.
Step 11: Saving, versions, and environments
You have edited. Now click Review.
You get a diff of exactly what changed, an optional commit message box, and a confirm. Confirming creates the new version. There is no "New Version" button anywhere, because every save is a new version. The commit message is optional, but write one anyway. Future you is a different person with no memory of today.
Every new version is created in development. Nothing you do in the editor can save straight to production, which is exactly the right call: the edit and the release are two separate decisions, made deliberately.
The version timeline shows each version with an environment badge, colour-coded: olive for production, blue for staging, orange for development. Right-click a version for the actions: Set as Latest, Set to Production, Set to Development, and Delete Version.
What promotion actually does
Promoting a version to production is transactional and more decisive than it sounds: it atomically demotes every other version of that prompt back to development. There is exactly one production version at a time, always. No ambiguity about what is live, which is the whole point of having environments in the first place.
What "rollback" actually means
Rollback in Ofuma does not copy old content forward, and does not revert anything. It re-promotes the older version row, in place, as-is. The row was never mutated to begin with, so there is nothing to restore.
Which is a nice reminder of why immutable versions are worth the trouble. Rollback is not a feature somebody had to build. It is a thing you get for free the moment you stop overwriting history.
Comparing versions
Two different diffs exist and they answer different questions:
The pre-save diff compares your unsaved edits against the version you started from. That is the one in the confirm modal, answering "what am I about to change."
The version comparison compares two already-saved versions. It runs a proper diff on the backend and adds a Metrics tab with execution count, latency, error rate, and cost side by side.
That second one is what answers "did v4 actually beat v3," which is the only question that really matters.
Step 12: Prompts inside prompts (composables)
If you have a chunk of text repeated across prompts, a house style block or a shared format spec, you can embed one prompt inside another. The syntax is distinctive:
@@@prompt:house_style;version=2;role=system;order=0@@@It is easier to insert from the composable popup than to type from memory: It shows up once you type in @@@ then you pick the prompt, then the version or label or environment you want to track, and the role and order fill themselves in. On every save these get resolved and recorded in a dependency table, so the relationship is tracked rather than being an invisible string in a blob of text. Update the shared block once and every prompt pointing at it moves together.
Step 13: Calling it from your code
This is the payoff for all of the above. Your engineer does not need to know any of it. They install the SDK and write:
import { OfumaSDK } from '@ofuma/sdk'

const ofuma = new OfumaSDK({
  apiKey: 'your-api-key', // your ofuma api key
  organizationId: 'your-org-id'
})

const result = await ofuma.prompts.execute({
  promptId: 'pr-my-prompt-abc123',
  variables: { userName: 'Jane Doe' }
})
That is the whole thing. A name and some variables.
Look at what is not in that snippet: no model, no temperature, no system message, no OpenAI key, no fallback logic, no guardrail checks. All of it lives in the version, and all of it can change without this code changing by a single character. The content designer rewrites the system message, promotes it, and this call silently starts behaving better. That is the entire thesis of the product, expressed in four lines.
You can pin to a specific version when you need determinism:
const result = await ofuma.prompts.execute({
  promptId: 'pr-my-prompt-abc123',
  versionId: 'version-uuid',
  variables: { userName: 'Alice' }
})
And promote from code, which is what your CI would call once its checks go green:
await ofuma.prompts.setVersionEnvironment({
  versionId: 'version-uuid',
  promptId: 'prompt-uuid',
  teamId: 'team-id',
  environment: 'production'
})
For staging work, point the SDK at the staging environment with env: 'staging' or env: 'stg' and it talks to ofuma staging environment.
Step 14: The four buttons in the header
Quickly, because each deserves its own article:
Feedback: thumbs up/down, a 1 to 5 rating, free text, a corrected output, and a category (
quality,accuracy,relevance,format,safety,other). The corrected output is the valuable one: it is a labelled example of right-versus-wrong, handed to you for free by the person who cared enough to fix it.Suggest Improvements: an LLM reads your feedback and eval data and proposes a rewrite. Accepting it creates a new version, so it goes through the same gate as everything else. No magic back door.
Optimize Costs: surfaces cost data for this specific prompt.
Publish to Registry: shares the prompt publicly, and is where tags get set.
Things worth remembering
If you skim one section, skim this one:
Creating a prompt gives you an empty folder. The first version appears at your first save.
The editor is read-only until you click Edit.
Every save is a new version, and every new version starts in development.
Promoting to production demotes every other version. One live version, always.
Rollback re-promotes an old row rather than restoring content, which is why it is instant.
default.escalatereads confidence fromlogprobs, which is on by default for OpenAI.Anthropic caps
max_tokensand it changes so need to check what it is. It also capstemperatureat 1. OpenAI does neither.Your calling code only ever needs a prompt ID and variables.
So what is this section really for?
Strip away the fields and the Prompts section makes one trade. It takes the recipe card off the kitchen wall, where anybody could scribble on it and nobody could remember yesterday's wording, and puts it somewhere with a name, a history, and a lock on the door to production.
The cost is that you have to learn some vocabulary: versions, environments, strategies, stages, severities. The payoff is that the sentence "who changed this, when, and can we put it back" stops being a horror story and becomes a right-click.
Everything else in Ofuma, the evaluations, the releases, the observability, is built on this one foundation: that a prompt is not a string in a file. It is a versioned artifact that happens to be readable by humans. I hope you are still with me, because next we go to the Playground, where you stop configuring a prompt and start firing it at a real model to see what comes back. 🧪
Write the vision; make it plain on tablets, that he may run who reads it. - Habakkuk 2:2